In what order should embroidery objects sew?
A machine file sews its objects one after another in a fixed order. That order affects how the design looks, because every object pulls and pushes the fabric a little and later objects land on fabric that has already moved. Digitizers plan it with a few working rules:
- Back to front. Background shapes sew first, then the shapes that sit on top of them, as in the artwork's layers.
- Larger areas before details. Big fills go down while the fabric is flattest; small details sew on top.
- Outlines last. A border sewn after the shapes it surrounds can cover their edges, hiding small shifts in the fabric.
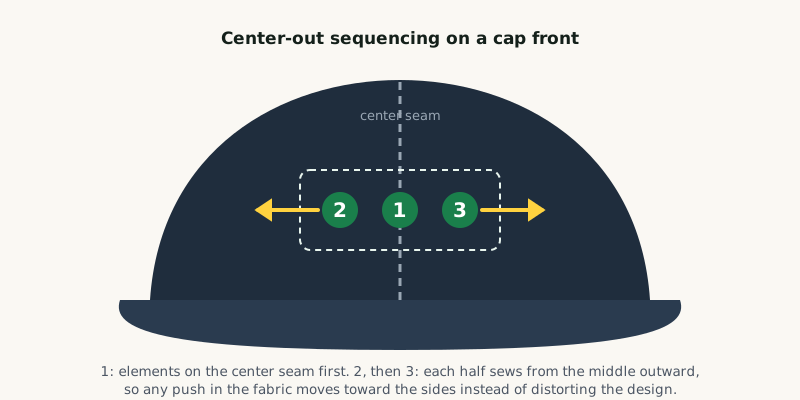
- Work outward. Moving across the design in one direction, rather than jumping from side to side, keeps the fabric from being pushed in different directions.
Poor order is a common cause of gaps between fills and outlines; see why embroidery outlines do not line up. Caps take this further: they sew from the center outward and from the bottom up, which our cap embroidery guide explains.
What are travel stitches and jump stitches?
When one object ends and the next starts somewhere else, the machine has to get there. There are two ways:
| Connector | How it moves | When digitizers use it |
|---|---|---|
| Travel (run) stitch | A running stitch sewn along the path to the next object | Short moves where the path will be covered by later stitching |
| Jump stitch | The frame moves without needle penetrations, leaving a loose thread | Longer moves; the thread is then tied off and trimmed |
Wilcom's help on using jumps as connectors describes jumps as moving the frame from one part of the design to another without needle penetrations, and notes that the connecting thread generally needs a tie-off and trim. A well planned file hides travel runs under objects that sew later, so they never show on the finished piece.
When does an embroidery machine trim the thread?
Trims are commands in the file. Software adds them automatically at every color change, and between objects when the gap is longer than a set distance. Hatch applies automatic trims when a connector is 3 mm or longer by default, according to its automatic connectors help. Wilcom gives the example of not wanting a trim between objects less than 2 mm apart, but wanting one once the design is enlarged and the gap grows past 2 mm.
Every trim costs time: the machine slows, cuts, and restarts. Too many trims make a design slow to run and leave more tails to tidy. Too few leave long jump threads on the front that someone has to cut by hand. The digitizer's job is to sequence objects so that most moves are short enough to travel and the rest are trimmed cleanly. Wilcom's guide to minimizing trims lists resequencing, joining touching objects and aligning start and end points as the main tools. You can see how trims add to run time with our free embroidery run time calculator.
What are tie-ins and tie-offs?
A trimmed thread end will pull out unless it is locked. Digitizers add small locking stitches at both ends of every cut:
- Tie-in (tack stitch): a few tiny stitches at the start of an object, so the new thread is held before the object starts sewing.
- Tie-off (lock stitch): a few tiny stitches at the end of an object, so the thread can be cut without unraveling.
The Ink/Stitch tack and lock stitch documentation applies them before and after a color change, around trim commands, and when the distance between objects is greater than the minimum jump stitch length. Wilcom advises setting the tie-off value at the same or a shorter length than the trim value, so every trimmed connector is locked.
How are color changes ordered?
Each color change stops the machine to switch needles, and on a single-needle machine it means rethreading by hand. So digitizers group objects of the same color into as few blocks as possible. Wilcom and Hatch both include tools to sequence objects by color for this reason.
Grouping by color is not always possible without breaking the back-to-front order. If a red shape sits under a blue shape that sits under another red detail, the red has to be sewn twice. The digitizer balances fewer color changes against correct layering, and correct layering usually wins. You can count a file's color stops and watch its sequence in our free DST file viewer.
Every file we deliver is hand digitized and sequenced for the machine and garment you name, checked by a second digitizer, and comes with a stitch simulation preview. See our embroidery digitizing service, the related pages on tatami fills and pull compensation, and the rest of the digitizing techniques hub.
Rather have it digitized for you?
Hand-digitized files from $10 per design, back in 4–8 hours, in every machine format.
Get a free quote →Frequently asked questions
Sources
- Ink/Stitch: tack and lock stitches
- Wilcom EmbroideryStudio help: use jumps as connectors
- Hatch Embroidery help: automatic connectors (trim distance)
- Wilcom: minimizing thread trims in embroidery
- Wilcom: connectors, the functions between objects
Sources checked 19 September 2026.