What is the difference between satin stitch and fill stitch?
Both stitches cover an area with thread, but they build it differently, and that changes how the design looks and how it wears.
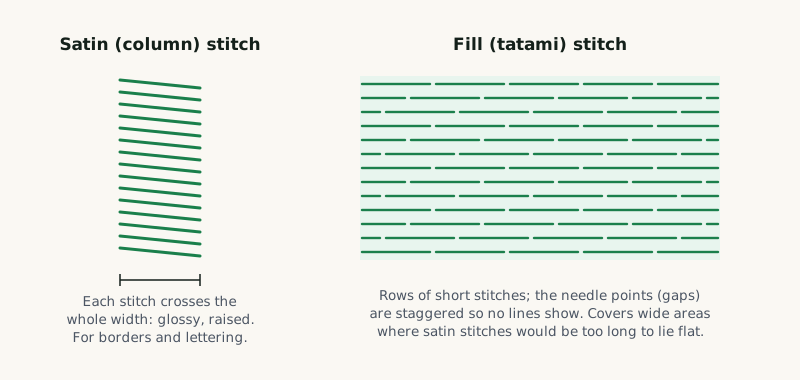
- Satin stitch (also called satin column) zigzags from one side of a shape to the other. Each stitch runs the full width, so the thread lies long and smooth and catches the light. Wilcom describes it as a smooth, shiny, high-density finish for lettering, borders and detail.
- Fill stitch, usually called tatami, sews rows of shorter stitches back and forth across the shape. The needle points are staggered from row to row, so the surface looks flat and slightly textured, with less shine. It is the standard way to cover large shapes and backgrounds. See our page on tatami stitch patterns and angles for how it is set up.
| Satin stitch | Fill (tatami) stitch | |
|---|---|---|
| How it sews | One stitch across the full width, side to side | Rows of short stitches, offset row to row |
| Look | Smooth, raised, high shine | Flat, even texture, lower shine |
| Best for | Lettering, borders, outlines with width, small shapes | Large shapes, backgrounds, wide areas |
| Main limit | Width: long stitches snag and loosen | Very narrow shapes, where rows become too short to look clean |
How wide can a satin stitch be?
The limit is the length of each stitch. Because a satin stitch spans the whole shape, a wide column means long, loose stitches that can snag on buttons, zips and washing, and that sit less flat on the fabric.
Wilcom, the maker of EmbroideryStudio, gives these working figures in its guide to satin and tatami stitches:
- Wilcom suggests staying within 10 mm of satin width.
- Around 12 mm is described as the ideal maximum.
- Stitches wider than that are best split. Wilcom's Auto Split help recommends a split length of 7 mm to keep the satin look.
A split satin breaks each long stitch into shorter ones and scatters the extra needle points so they do not line up into a visible groove. Ink/Stitch has the same idea as a maximum stitch length on its satin columns: stitches wider than the value are split up.
A column that is 4 mm wide on a left-chest logo becomes 12 mm if the same file is enlarged three times for a jacket back. Scaling a stitch file does not change stitch types, so a design meant for one size can end up with satins far past these limits. Wide satins should be rebuilt as fill or split satin, not just stretched.
When does a digitizer switch from satin to fill?
The decision is made shape by shape, not for the whole design. A digitizer looks at each object at its finished size and asks four questions:
- How wide is it? Under the satin limit it can be satin. Past it, it becomes fill or split satin.
- Does it vary in width? A shape that is thin in one place and wide in another (a swoosh, a leaf) is often split into a satin part and a fill part, or sewn as fill throughout for an even look.
- Should it shine? Lettering and borders usually look best in satin, so a digitizer will keep them satin as long as the width allows.
- What fabric is it on? On towels and fleece, long satins can sink into the pile, so heavier underlay or a switch to fill may be needed. See embroidery underlay types and settings.
Both stitch types also need pull compensation, because both pull the fabric in as they sew, and satin shows it most. Mixing them is normal: a typical logo has a tatami background, satin lettering on top and a satin or running stitch border. You can see where every satin and fill sits by opening a file in our free DST file viewer.
Where do running stitch and bean stitch fit in?
For lines too thin for satin, digitizers use a running stitch: a series of small stitches along a line or curve, one thread thick. It is used for fine outlines, detail lines and travel paths hidden under other stitches.
A single running stitch can look thin on the finished piece. The Ink/Stitch running stitch documentation notes that a simple pass is usually too thin, so it is often sewn as a bean stitch instead: each stitch is repeated back and forth, which makes the line wider and more distinct without becoming a satin column.
| Element | Usual stitch |
|---|---|
| Hairline outline, fine detail | Running stitch |
| Outline that must read clearly | Bean stitch, or a narrow satin |
| Lettering and borders within the satin limit | Satin |
| Wide lettering, large shapes, backgrounds | Fill (tatami), or split satin |
How do you tell if a file used the wrong stitch?
- Loose, loopy stitches on wide lettering or borders: satin used past its width limit.
- A thin, broken look on outlines: single running stitch where a bean stitch or narrow satin was needed.
- Stepped, blocky edges on narrow shapes: fill used where the shape was too thin for its rows.
- Tiny text that fills in: satin columns too heavy for the letter size. See why small text fills in.
These are fixed in the digitizing, not on the machine. Our digitizers hand digitize every file for its finished size and fabric, choosing satin, fill or running stitch per object, and a second digitizer checks it. If you need a logo built that way, our embroidery digitizing service starts from $10 per design. More techniques are in the digitizing techniques hub.
Rather have it digitized for you?
Hand-digitized files from $10 per design, back in 4–8 hours, in every machine format.
Get a free quote →Frequently asked questions
Sources
- Wilcom: mastering satin stitch and tatami stitch (width and split recommendations)
- Wilcom EmbroideryStudio help: split satin stitches (Auto Split)
- Ink/Stitch: satin column (maximum stitch length, pull compensation)
- Ink/Stitch: running stitch and bean stitch
Sources checked 19 September 2026.